Music App in Android Studio
Here’s what the app gonna do:
It will show all the songs (.mp3 or .wav files) in a listView, when user will tap in any of the item in the list. Media player will start playing that song. It will also give user options to FastForward, Revind, Go to Next song, Go to Previous song, Play and Pause the song, go to aparticular part of song using progress bar.
I learnt :
- A lot about UI designs.
- ListView
- MediaPlayer
Let’s start :
res>layout>activity_main.xml
Our main Activity will be a simple listView within a Relative Layout :
<?xml version="1.0" encoding="utf-8"?>
<RelativeLayout xmlns:android="http://schemas.android.com/apk/res/android"
    xmlns:app="http://schemas.android.com/apk/res-auto"
    xmlns:tools="http://schemas.android.com/tools"
    android:layout_width="match_parent"
    android:layout_height="match_parent"
    tools:context=".MainActivity"
    android:background="@color/black">
    <ListView
        android:id="@+id/Listsongs"
        android:layout_width="match_parent"
        android:layout_height="match_parent"
        android:divider="@android:color/transparent"
        android:dividerHeight="10.0sp"
        android:padding="8dp"/>
</RelativeLayout>
This listView was preety simple. So I decided to customize my list. Each item of my list is in the form of a card and this card has 2 views : ImageView and TextView. Here’s the sample of a card in listView.

Let’s see how to make this card for list items.
res>layout>right-click>new>layout Resource File>name (list_item.xml)
<?xml version="1.0" encoding="utf-8"?>
<androidx.cardview.widget.CardView
    xmlns:android="http://schemas.android.com/apk/res/android" android:layout_width="match_parent"
    android:layout_height="wrap_content"
    android:layout_marginEnd="8dp"
    android:layout_marginTop="8dp"
    android:layout_marginStart="8dp">
    <RelativeLayout
        android:padding="8dp"
        android:background="@drawable/list_bg"
        android:layout_width="match_parent"
        android:layout_height="wrap_content">
        <ImageView
            android:id="@+id/img_song"
            android:layout_width="40dp"
            android:layout_height="40dp"
            android:layout_alignParentStart="true"
            android:layout_alignParentTop="true"
            android:background="@drawable/list_bg"
            android:src="@drawable/ic_baseline_headset_24"
            android:outlineAmbientShadowColor="@color/black"/>
        <TextView
            android:id="@+id/song_name"
            android:layout_width="wrap_content"
            android:layout_height="40dp"
            android:layout_alignParentEnd="true"
            android:layout_marginStart="5dp"
            android:layout_marginEnd="5dp"
            android:layout_toRightOf="@+id/img_song"
            android:padding="6dp"
            android:textColor="@color/black"
            android:text="Song name"
            android:textStyle="italic"
            android:textSize="15sp"
            android:singleLine="true"
            android:marqueeRepeatLimit="marquee_forever"
            android:ellipsize="marquee"
            android:scrollHorizontally="true"/>
    </RelativeLayout>
</androidx.cardview.widget.CardView>
With the help of CardView we can display different views over each other. Here we are using relative layout within the card view bcz we want textView to be placed “toRightof” ImageView.
ImageView : Here, the source of ImageView is from the vector. res>drawable>vector asset>select a headset icon from there. Android Studio will create an xml file “@drawable/ic_baseline_headset_24.xml” for you; choose the color you want.
TextView : Here, special thing about TextView is that it will be a single line irrespective of the length of the SongName. What if the length of the song name is too large to get accomodate inside the textView? Well then, rather than breaking the textView from the middle we will “ellipsize” it. (Ellipsize means shortening the textView using “…” like “…aabb” or “aabb…”or “aa…bb” or we can give the output as “aabbcc” auto sliding from left to right, for this we need marquee). Here we’re gonna use marquee, so if there’s a lengthy song name, complete song name in a single line will slide horizontally.
android:marqueeRepeatLimit="marquee_forever"
            android:ellipsize="marquee"
            android:scrollHorizontally="true"
Background : For the background of both ImageView and TextView , i wanted to have some different shapes and colours so i made a new drawable file “list_bg.xml” for that. res>drawable>right-click>new>drawable resource file>name(list_bg.xml). I choose rectangular shape and some color gradient as per my choice. Here’s the code for that:
<?xml version="1.0" encoding="utf-8"?>
<shape xmlns:android="http://schemas.android.com/apk/res/android">
    android:shape = "rectangle"
    <gradient android:centerColor="#d3d3d3"
        android:endColor="#7f7f7f"
        android:startColor="#7f7f7f" />
</shape>
With this we are done with the layout files for this very activity. Now we will implement the listView (display the items inside ListView).
So, we have to search for the songs(.mp3 or .wav files) in our phone and display the name of those files in our list (textView part of our list). This is what we will implement in this activity.
So, let’s start it :
java>package_name>MainActivity.java :
We will start by defining and initialising the views we are using in our Layout. Our main layout file is having only one View (ListView) although there are views within list view but we can’t define or initialise them for now. So;
ListView listView;listView = (ListView) findViewById(R.id.Listsongs);
Now, as we are finding the music files that are within phone ; So we need a permission to read the external storage of the device. Also we will require one more permission i.e. Record Audio permission(why? we will see later). Add these permission in the “AndroidManifest.xml” :
<uses-permission android:name="android.permission.READ_EXTERNAL_STORAGE" />
<uses-permission android:name="android.permission.RECORD_AUDIO"/>
Here’s something new : We will ask permission from the user at the run time(while app started running) not while installing. There’s a class “Dexter” that simplify android runtime permissions . To learn more about Dexter, you can read from here.
It will require you to add a dependency in build.gradle :
implementation 'com.karumi:dexter:6.2.2'Here we are going to add 2 runtime permissions; so our code will be :
//Using Dexter to request the permission at runtime
public void RunTimePermission(){
    Dexter.withContext(MainActivity.this)
            .withPermissions(Manifest.permission.READ_EXTERNAL_STORAGE,Manifest.permission.RECORD_AUDIO)
            .withListener(new MultiplePermissionsListener() {
                @Override
                public void onPermissionsChecked(MultiplePermissionsReport multiplePermissionsReport) {
                    DisplaySongs();
                }
                @Override
                public void onPermissionRationaleShouldBeShown(List<PermissionRequest> list, PermissionToken permissionToken) {
                    permissionToken.continuePermissionRequest();
                }
            }).check();
}
We will talk about permission listener here :
It overrides 2 methods ;
- onPermissionsChecked() will be called if all permissions are granted.
- onPermissionRationaleShouldBeShown() will be called if the user has already declined the permission once.This method contains PermissionToken parameter using which you can call any of the two methods :
- continuePermissionRequest() : Continues with the permission request process.(the one we are using here in our case)
- cancelPermissionRequest() : Cancels the permission request process.
So, here in this code snippet we are saying that : if our app will get the permission then we will call a method “DisplaySongs()” (discuss this method later) ; if user will deny the permission app will request again again.
With this, permission part is done.
Now we will find the songs from our devices. So basically we are going to look if there is any .mp3 or .wav file in our device’s storage, and after finding them i am going to add these files in an arrayList. This ArrayList is going to conatin all music files present in the external storage of my device. Code Snippet for the method to perform this function :
//finding the list of songs (.mp3 / .wav) files in the external //storage
public ArrayList<File> FindSong(File file)
{
    ArrayList<File> arrayList = new ArrayList<>();
    File[] files = file.listFiles();
    for(File singlefile:files)
    {
        if(singlefile.isDirectory() && !singlefile.isHidden())
        {
            arrayList.addAll(FindSong(singlefile));
        }
        else{
            if(singlefile.getName().endsWith(".mp3")||singlefile.getName().endsWith(".wav"))
            {
                arrayList.add(singlefile);
            }
        }
    }
    return arrayList;
}
Argument : (File) We will pass the absolute path for our External Directory as the argument for this funtion.
Return : it will return the arrayList containing the abstract pathnames of the files within this directory(that we pass as an argument).
Working : We will create an array of the abstract pathnames of the files within the directory (that we passed as an argument). We will iterate through this array and denote each file as “singleFile” . We will check if singleFile is an unhidden directory or not : (a) if yess; we will find the files within this directory(make a reccurssive call to this method) (b) if no; we will check if file name is ending with “.mp3” or “.wav” and add this file in our array list.
We now have an arrayList with all music files in our device. Now we will display the name of these Music Files in our ListView. So; firstly let’s extract the name of these music files and store it in some array. We can do this by :
final ArrayList<File> mySongs = FindSong(Environment.getExternalStorageDirectory().getAbsoluteFile());
//adding the name of these music files in an Array of String
items = new String[mySongs.size()];
for(int i=0;i<mySongs.size();i++)
{
    items[i]= mySongs.get(i).getName().toString().replace(".mp3","").replace("wav","");
}
We extracted the name of the music Files and stored it in “item[]” array.
Now item[] exactly contains the content that we will show in our listView. To show the data of item[] array in ListView we need CustomAdapter(bcz our listView is customized, it contains 2 views listView and ImageView and we have to fill the data in TextView only).
//class for customized listView
 class CustomAdapter extends BaseAdapter{
     @Override
     public int getCount() {
         return items.length;
     }
     @Override
     public Object getItem(int position) {
         return null;
     }
     @Override
     public long getItemId(int position) {
         return 0;
     }
     @Override
     public View getView(int position, View convertView, ViewGroup parent) {
         View myView = getLayoutInflater().inflate(R.layout.list_item,null);
         TextView song_name = myView.findViewById(R.id.song_name);
         song_name.setSelected(true);
         song_name.setText(items[position]);
         return myView;
     }
 }
getView() method in this class returns the View to be displayed inside the parent View(ListView in our case). Here we want the layout we defined in “list_item.xml” to be the view of each child in the ListView. So we will inflate our listView with the same layout.
View myView = getLayoutInflater().inflate(R.layout.list_item,null);Next we want is the name of song to appear in the TextView we defined in “list_item.xml” by this snippet:
TextView song_name = myView.findViewById(R.id.song_name);
song_name.setSelected(true);
song_name.setText(items[position]);
Finally we will return the myView.
And with this our CustomAdapter is ready ; we will now call this CustomAdapter for our ListView.
CustomAdapter customAdapter = new CustomAdapter();
listView.setAdapter(customAdapter);
With this our List is ready; now all we want from this activity is that; if user will click any of the list item , he will be directed to next activity where we will play the song. So we have to create a new activity (java>package_name>right-click>new>activity>empty activity>name (Music_Player)
On the click of any item; we will move to the “Music_Player” activity where this song will be played. So, we have to call an intent on the click of items in ListView and we have to send some of the song’s credentials from the list to the other activity. This function wil achieve this :
listView.setOnItemClickListener(new AdapterView.OnItemClickListener() {
    @Override
    public void onItemClick(AdapterView<?> parent, View view, int position, long id) {
        String songName = (String) listView.getItemAtPosition(position);
        startActivity(new Intent(getApplicationContext(),Music_Player.class)
        .putExtra("songs",mySongs)
        .putExtra("song_name",songName)
        .putExtra("pos",position));
    }
});
We are passing key for ArrayList(having list of all music files), Song_name, Position (of song in list) from this Activity to Music_player Activity.
Some of the code snippet i defined above Together forms the function DisplaySongs() :
void DisplaySongs()
{
    final ArrayList<File> mySongs = FindSong(Environment.getExternalStorageDirectory().getAbsoluteFile());
    //adding the name of these music files in an Array of String
    items = new String[mySongs.size()];
    for(int i=0;i<mySongs.size();i++)
    {
        items[i]= mySongs.get(i).getName().toString().replace(".mp3","").replace("wav","");
    }
    //Array adapter will add the contents of the string array in list View
   /* ArrayAdapter<String> myAdapter = new ArrayAdapter<String>(MainActivity.this, android.R.layout.simple_list_item_1, items);
    listView.setAdapter(myAdapter);*/
    CustomAdapter customAdapter = new CustomAdapter();
    listView.setAdapter(customAdapter);
    listView.setOnItemClickListener(new AdapterView.OnItemClickListener() {
        @Override
        public void onItemClick(AdapterView<?> parent, View view, int position, long id) {
            String songName = (String) listView.getItemAtPosition(position);
            startActivity(new Intent(getApplicationContext(),Music_Player.class)
            .putExtra("songs",mySongs)
            .putExtra("song_name",songName)
            .putExtra("pos",position));
        }
    });
}
Complete Java class:
MainActivity.java :
package com.example.mymusic;

import androidx.appcompat.app.AppCompatActivity;

import android.Manifest;
import android.content.Intent;
import android.os.Bundle;
import android.os.Environment;
import android.view.View;
import android.view.ViewGroup;
import android.widget.AdapterView;
import android.widget.ArrayAdapter;
import android.widget.BaseAdapter;
import android.widget.ListView;
import android.widget.TextView;

import com.karumi.dexter.Dexter;
import com.karumi.dexter.MultiplePermissionsReport;
import com.karumi.dexter.PermissionToken;
import com.karumi.dexter.listener.PermissionDeniedResponse;
import com.karumi.dexter.listener.PermissionGrantedResponse;
import com.karumi.dexter.listener.PermissionRequest;
import com.karumi.dexter.listener.multi.MultiplePermissionsListener;
import com.karumi.dexter.listener.single.PermissionListener;

import java.io.File;
import java.util.ArrayList;
import java.util.List;

public class MainActivity extends AppCompatActivity {
    ListView listView;
    String[] items;

    @Override
    protected void onCreate(Bundle savedInstanceState) {
        super.onCreate(savedInstanceState);
        setContentView(R.layout.activity_main);
        listView = (ListView) findViewById(R.id.Listsongs);
        RunTimePermission();

    }
    //Using Dexter to request the permission at runtime
    public void RunTimePermission(){
        Dexter.withContext(MainActivity.this)
                .withPermissions(Manifest.permission.READ_EXTERNAL_STORAGE,Manifest.permission.RECORD_AUDIO)
                .withListener(new MultiplePermissionsListener() {
                    @Override
                    public void onPermissionsChecked(MultiplePermissionsReport multiplePermissionsReport) {
                        DisplaySongs();
                    }
                    @Override
                    public void onPermissionRationaleShouldBeShown(List<PermissionRequest> list, PermissionToken permissionToken) {
                        permissionToken.continuePermissionRequest();
                    }
                }).check();
    }

    //finding the list of songs (.mp3 / .wav) files in the external storage
    public ArrayList<File> FindSong(File file)
    {
        ArrayList<File> arrayList = new ArrayList<>();
        File[] files = file.listFiles();
        for(File singlefile:files)
        {
            if(singlefile.isDirectory() && !singlefile.isHidden())
            {
                arrayList.addAll(FindSong(singlefile));
            }
            else{
                if(singlefile.getName().endsWith(".mp3")||singlefile.getName().endsWith(".wav"))
                {
                    arrayList.add(singlefile);
                }
            }
        }
        return arrayList;
    }

    //to display the songs in listView
    void DisplaySongs()
    {
        final ArrayList<File> mySongs = FindSong(Environment.getExternalStorageDirectory().getAbsoluteFile());
        //adding the name of these music files in an Array of String
        items = new String[mySongs.size()];
        for(int i=0;i<mySongs.size();i++)
        {
            items[i]= mySongs.get(i).getName().toString().replace(".mp3","").replace("wav","");
        }
        //Array adapter will add the contents of the string array in list View
       /* ArrayAdapter<String> myAdapter = new ArrayAdapter<String>(MainActivity.this, android.R.layout.simple_list_item_1, items);
        listView.setAdapter(myAdapter);*/
        CustomAdapter customAdapter = new CustomAdapter();
        listView.setAdapter(customAdapter);
        listView.setOnItemClickListener(new AdapterView.OnItemClickListener() {
            @Override
            public void onItemClick(AdapterView<?> parent, View view, int position, long id) {
                String songName = (String) listView.getItemAtPosition(position);
                startActivity(new Intent(getApplicationContext(),Music_Player.class)
                .putExtra("songs",mySongs)
                .putExtra("song_name",songName)
                .putExtra("pos",position));
            }
        });
    }

   //class for customized listView
    class CustomAdapter extends BaseAdapter{
        @Override
        public int getCount() {
            return items.length;
        }
        @Override
        public Object getItem(int position) {
            return null;
        }
        @Override
        public long getItemId(int position) {
            return 0;
        }
        @Override
        public View getView(int position, View convertView, ViewGroup parent) {
            View myView = getLayoutInflater().inflate(R.layout.list_item,null);
            TextView song_name = myView.findViewById(R.id.song_name);
            song_name.setSelected(true);
            song_name.setText(items[position]);
            return myView;
        }
    }
}
Now ; Let’s move to Music_Player Activity :
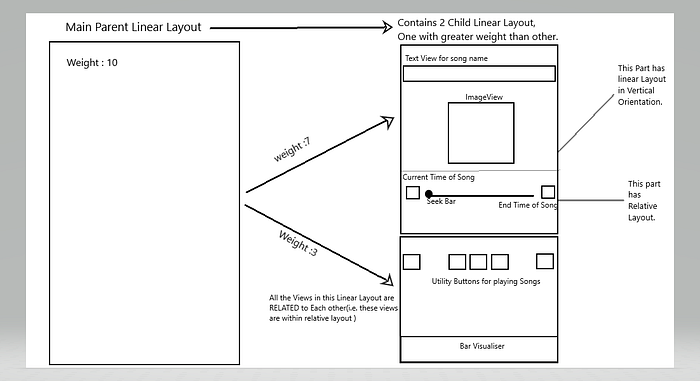
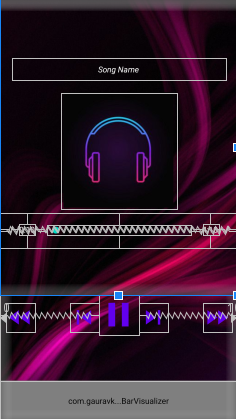
Let’s Design the UI for Music_Player Activity. So in this activity, we need Name of Song, Play and Pause Button, Fast Forward Button(forward song for 10sec), Revind Button(revind song 10 sec backward), Next Button(move to next song), Previous Button(move to previous song), seek bar (to slide through the song)and am gonna use an image view, a background, a bar visualiser to make it look nice. Here’s what we will get after designing the layout :

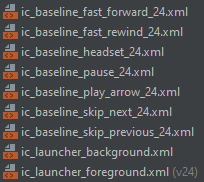
Choose the background Image of your choice and paste it in the drawable folder, similarly choose the image you want for the imageView and paste it. We will need some of the clipart for the buttons. So create these Vector Asset in your drawable folder :
We are done with all our pre-requisites; lets head to the “activity_music__player.xml” :
Here’s how we gonna devide it:
So, res>layout>activity_music__player.xml :
<?xml version="1.0" encoding="utf-8"?>
<LinearLayout xmlns:android="http://schemas.android.com/apk/res/android"
    xmlns:app="http://schemas.android.com/apk/res-auto"
    xmlns:tools="http://schemas.android.com/tools"
    android:layout_width="match_parent"
    android:layout_height="match_parent"
    tools:context=".Music_Player"
    android:background="@drawable/bg"
    android:orientation="vertical"
    android:weightSum="10">
    <LinearLayout
        android:layout_width="match_parent"
        android:layout_height="0dp"
        android:layout_weight="7"
        android:gravity="center"
        android:orientation="vertical">
    <TextView
        android:layout_width="match_parent"
        android:layout_height="wrap_content"
        android:id="@+id/text1"
        android:layout_margin="20dp"
        android:ellipsize="marquee"
        android:marqueeRepeatLimit="marquee_forever"
        android:padding="10dp"
        android:singleLine="true"
        android:text="Song Name"
        android:textColor="@color/white"
        android:textAlignment="center"
        android:textStyle="italic"/>
        <ImageView
            android:id="@+id/song_icon"
            android:layout_width="200dp"
            android:layout_height="200dp"
            android:layout_marginBottom="8dp"
            android:src="@drawable/headphone"/>
        <RelativeLayout
            android:layout_width="match_parent"
            android:layout_height="60dp">
            <SeekBar
                android:id="@+id/seek_bar"
                android:layout_centerInParent="true"
                android:layout_alignParentBottom="true"
                android:layout_margin="20dp"
                android:layout_marginBottom="40dp"
                android:layout_width="250dp"
                android:layout_height="wrap_content"/>

            <TextView
                android:id="@+id/txtStart"
                android:layout_width="wrap_content"
                android:layout_height="wrap_content"
                android:layout_centerInParent="true"
                android:layout_alignParentLeft="false"
                android:layout_marginLeft="20dp"
                android:layout_toLeftOf="@id/seek_bar"
                android:text="0:10"
                android:textColor="@color/white"
                android:textSize="14sp" />

            <TextView
                android:id="@+id/txtStop"
                android:layout_width="wrap_content"
                android:layout_height="wrap_content"
                android:layout_centerInParent="true"
                android:layout_alignParentRight="false"
                android:layout_marginRight="20dp"
                android:layout_toRightOf="@id/seek_bar"
                android:text="4:10"
                android:textColor="@color/white"
                android:textSize="14sp" />
        </RelativeLayout>
    </LinearLayout>

    <LinearLayout
        android:layout_width="match_parent"
        android:layout_height="0dp"
        android:layout_weight="3">

        <RelativeLayout
            android:layout_width="match_parent"
            android:layout_height="wrap_content">

            <Button
                android:id="@+id/playbtn"
                android:layout_width="70dp"
                android:layout_height="70dp"
                android:layout_centerHorizontal="true"
                android:background="@drawable/ic_baseline_pause_24" />

            <Button
                android:id="@+id/btnNext"
                android:layout_width="50dp"
                android:layout_height="50dp"
                android:layout_marginTop="15dp"
                android:layout_toRightOf="@id/playbtn"
                android:background="@drawable/ic_baseline_skip_next_24" />

            <Button
                android:id="@+id/btnPrev"
                android:layout_width="50dp"
                android:layout_height="50dp"
                android:layout_marginTop="15dp"
                android:layout_toLeftOf="@id/playbtn"
                android:background="@drawable/ic_baseline_skip_previous_24" />

            <Button
                android:id="@+id/btnRevind"
                android:layout_width="50dp"
                android:layout_height="50dp"
                android:layout_alignParentLeft="true"
                android:layout_marginLeft="10dp"
                android:layout_marginTop="15dp"
                android:background="@drawable/ic_baseline_fast_rewind_24" />

            <Button
                android:id="@+id/btnFastForward"
                android:layout_width="50dp"
                android:layout_height="50dp"
                android:layout_alignParentRight="true"
                android:layout_marginTop="15dp"
                android:layout_marginRight="10dp"
                android:background="@drawable/ic_baseline_fast_forward_24" />
            <com.gauravk.audiovisualizer.visualizer.BarVisualizer
                xmlns:custom="http://schemas.android.com/apk/res-auto"
                android:id="@+id/blast"
                android:layout_width="match_parent"
                android:layout_height="70dp"
                android:layout_alignParentBottom="true"
                custom:avDensity="0.5"
                custom:avType="outline"
                custom:avColor="#DF00FE"
                custom:avWidth="4dp"
                custom:avSpeed="normal"/>

        </RelativeLayout>

    </LinearLayout>

</LinearLayout>
Everything is quite familiar except
“com.gauravk.audiovisualizer.visualizer.BarVisualizer” this bar visualizer. So what is the bar visualizer? Where did we get this code for bar visualizer?
Have a look at this for answer.
And also; you might remember that in the very starting we took a permission from user for Audio Record. Well; bcz bar visualizer don’t work without this permission.
Let’s see the Implementation of the views we have defined in layout file.
java>package_name>Music_Player.java:
Let’s start by defining and initialising the views.
public class Music_Player extends AppCompatActivity {
    Button PlayBtn,NextBtn,PrevBtn,FastForwardBtn,RevindBtn;
    TextView Name_Song,txt_Start,txt_End;
    SeekBar seekBar;
    BarVisualizer barVisualizer;
    ImageView imageView;
protected void onCreate(Bundle savedInstanceState) {
    super.onCreate(savedInstanceState);
    setContentView(R.layout.activity_music__player);
PlayBtn = (Button)findViewById(R.id.playbtn);
NextBtn = (Button)findViewById(R.id.btnNext);
PrevBtn = (Button)findViewById(R.id.btnPrev);
FastForwardBtn = (Button)findViewById(R.id.btnFastForward);
RevindBtn = (Button)findViewById(R.id.btnRevind);
Name_Song = (TextView)findViewById(R.id.text1);
txt_Start = (TextView)findViewById(R.id.txtStart);
txt_End = (TextView)findViewById(R.id.txtStop);
seekBar = (SeekBar)findViewById(R.id.seek_bar);
barVisualizer = (BarVisualizer)findViewById(R.id.blast);
imageView = (ImageView) findViewById(R.id.song_icon);
Let’s get the credentials of the song that we passed through intent in this activity.
String Sname;
public static final String EXTRA_NAME = "song_name";
int position;
ArrayList<File> mySongs;
Intent i = getIntent();
Bundle bundle=i.getExtras();
mySongs = (ArrayList)bundle.getParcelableArrayList("songs");
String SONG_NAME = (String)bundle.getString("song_name");
position= (int)bundle.getInt("pos",0);
Name_Song.setSelected(true);
Uri uri= Uri.parse(mySongs.get(position).toString());
Sname = mySongs.get(position).getName();
Name_Song.setText(Sname);
Android studio provides us a MediaPlayer class to control audio/video playbacks. So we gonna use it here.
MediaPlayer mediaPlayer;if(mediaPlayer!=null)
{
    mediaPlayer.stop();
    mediaPlayer.release();
}

mediaPlayer = MediaPlayer.create(getApplicationContext(),uri);
mediaPlayer.start();
Before starting the mediaPlayer; we should always check if it has already started or paused that media (mediaPlayer!=null); if that comes to be true; we are gonna stop that song and release the objects related to it.
Let’s work on the implementation of utility buttons now.
Play /pause Button :
PlayBtn.setOnClickListener(new View.OnClickListener() {
    @Override
    public void onClick(View v) {
        if(mediaPlayer.isPlaying())
        {
            PlayBtn.setBackgroundResource(R.drawable.ic_baseline_play_arrow_24);
            mediaPlayer.pause();
        }
        else
        {
            PlayBtn.setBackgroundResource(R.drawable.ic_baseline_pause_24);
            mediaPlayer.start();
        }
    }
});
if we clicked the button while already song is playing ; we are gonna pause it and the play_arrow will get set ; else we will start the song and replayce the sign with pause button.
FastForward and Revind Buttons :
FastForwardBtn.setOnClickListener(new View.OnClickListener() {
    @Override
    public void onClick(View v) {
        if(mediaPlayer.isPlaying())
        {
            mediaPlayer.seekTo(mediaPlayer.getCurrentPosition()+10000);
        }
    }
});
RevindBtn.setOnClickListener(new View.OnClickListener() {
    @Override
    public void onClick(View v) {
        if(mediaPlayer.isPlaying())
        {
            mediaPlayer.seekTo(mediaPlayer.getCurrentPosition()-10000);
        }
    }
});
seekTo (milisecond) function is used to shift to milisecond time forward or back. Here we are getting 10 sec forward or backward.
For NextBtn and PrevBtn we have to define some more methods first.
I want my image view to show some animation when i get to the next or previous song.
public void StartAnimation(View view)
{
    ObjectAnimator animator= ObjectAnimator.ofFloat(imageView,"rotation",0f,360f);
    animator.setDuration(1000);
    AnimatorSet animatorSet = new AnimatorSet();
    animatorSet.playTogether(animator);
    animatorSet.start();
}
We are creating a rotation animation for the imageView of our layout and we want this animation to come into play whenever we will shift from present song to next or previous song.
For NextBtn :
NextBtn.setOnClickListener(new View.OnClickListener() {
    @Override
    public void onClick(View v) {
        mediaPlayer.stop();
        mediaPlayer.release();
        position = (((position+1)==mySongs.size())?0:position+1);
        Uri u = Uri.parse(mySongs.get(position).toString());
        mediaPlayer = MediaPlayer.create(getApplicationContext(),u);
        Sname = mySongs.get(position).getName();
        Name_Song.setText(Sname);
        mediaPlayer.start();
        PlayBtn.setBackgroundResource(R.drawable.ic_baseline_pause_24);
        StartAnimation(imageView);
        int audioSessionId = mediaPlayer.getAudioSessionId();
        if(audioSessionId!=-1)
        {
            barVisualizer.setAudioSessionId(audioSessionId);
        }
    }
});
When NextBtn is clicked :
👍Stop the song that was playing previously and Release the objects related to it.
👍Update the “position” variable and with the help of “position” variable ; update Uri, Song Name, Start the mediaPlayer for thath song.
👍Change the sign to pause button; perform the animation; start the barVisualizer till the entire audio session (if the song is paused in between barVisualizer will stop itself)
Similarly; for PrevButton :
PrevBtn.setOnClickListener(new View.OnClickListener() {
    @Override
    public void onClick(View v) {
        mediaPlayer.stop();
        mediaPlayer.release();
        position=((position-1)<0)?mySongs.size()-1:(position-1);
        Uri uri1 = Uri.parse(mySongs.get(position).toString());
        mediaPlayer = MediaPlayer.create(getApplicationContext(),uri1);
        Sname = mySongs.get(position).getName();
        Name_Song.setText(Sname);
        mediaPlayer.start();
        PlayBtn.setBackgroundResource(R.drawable.ic_baseline_pause_24);
        StartAnimation(imageView);
        int audioSessionId = mediaPlayer.getAudioSessionId();
        if(audioSessionId!=-1)
        {
            barVisualizer.setAudioSessionId(audioSessionId);
        }
    }
});
When any song gets complete ; i want to switch to next song; so we will implement this by :
mediaPlayer.setOnCompletionListener(new MediaPlayer.OnCompletionListener() {
    @Override
    public void onCompletion(MediaPlayer mp) {
        NextBtn.performClick();
    }
});
Now let’s see the implementation of; how to get Current_Time and end_time on both the sides of SeekBar. End Time will always be the same i.e. the duration of the song. Create time is converting the time is milisecond to time in “min:sec” format.
String endTime = createTime(mediaPlayer.getDuration());
txt_End.setText(endTime);public String createTime(int duration)
    {
        String time ="";
        int min = duration/1000/60;
        int sec = duration/1000%60;
        time+=min+":";
        if(sec<10)
        {
            time+="0";
        }
        time+=sec;
        return time;
    }
}
Now for current time :
final Handler handler= new Handler();
final int Delay =1000;
handler.postDelayed(new Runnable() {
    @Override
    public void run() {
        String currentTime = createTime(mediaPlayer.getCurrentPosition());
        txt_Start.setText(currentTime);
        handler.postDelayed(this,Delay);
    }
},Delay);
There are two main uses for a Handler: (1) to schedule messages and runnables to be executed at some point in the future; and (2) to enqueue an action to be performed on a different thread than your own.
Here we are concerned with (1); we are going to schedule “runnables after some delay” ; Look in the code snippet above : we want to schedule a runnable after the delay of 1000ms (1 sec)
public void run() {
        String currentTime = createTime(mediaPlayer.getCurrentPosition());
        txt_Start.setText(currentTime);
        handler.postDelayed(this,Delay);
    }
We are setting currentTime in the text view after every one sec.
For seek bar:
We are making a new thread, after setting the max point at which seek bar can reach , we will start our new thread, which will set the position of seekbar according to the currentPosition of song. This thread will execute till the entire song is not completed.
Thread updateSeekBar;updateSeekBar= new Thread(){
    @Override
    public void run() {
        int totalDuration = mediaPlayer.getDuration();
        int currentPosition = 0;
        while(currentPosition<totalDuration)
        {
            try {
                sleep(500);
                currentPosition= mediaPlayer.getCurrentPosition();
                seekBar.setProgress(currentPosition);
                }
            catch (InterruptedException | IllegalStateException e)
            {
                e.printStackTrace();
            }

        }
    }
};
seekBar.setMax(mediaPlayer.getDuration());
updateSeekBar.start();
seekBar.setOnSeekBarChangeListener(new SeekBar.OnSeekBarChangeListener() {
    @Override
    public void onProgressChanged(SeekBar seekBar, int progress, boolean fromUser) {

    }

    @Override
    public void onStartTrackingTouch(SeekBar seekBar) {

    }

    @Override
    public void onStopTrackingTouch(SeekBar seekBar) {
        mediaPlayer.seekTo(seekBar.getProgress());
    }
});
Entire code for the mainActivity.java is :
package com.example.mymusic;

import androidx.annotation.NonNull;
import androidx.appcompat.app.AppCompatActivity;

import android.animation.AnimatorSet;
import android.animation.ObjectAnimator;
import android.content.Intent;
import android.media.MediaPlayer;
import android.net.Uri;
import android.os.Bundle;
import android.os.Handler;
import android.view.MenuItem;
import android.view.View;
import android.widget.Button;
import android.widget.ImageView;
import android.widget.SeekBar;
import android.widget.TextView;

import com.gauravk.audiovisualizer.visualizer.BarVisualizer;

import java.io.File;
import java.util.ArrayList;

public class Music_Player extends AppCompatActivity {
    Button PlayBtn,NextBtn,PrevBtn,FastForwardBtn,RevindBtn;
    TextView Name_Song,txt_Start,txt_End;
    SeekBar seekBar;
    BarVisualizer barVisualizer;
    ImageView imageView;

    String Sname;
    public static final String EXTRA_NAME = "song_name";
    int position;
    ArrayList<File> mySongs;
    MediaPlayer mediaPlayer;
    Thread updateSeekBar;

    @Override
    public boolean onOptionsItemSelected(@NonNull MenuItem item) {
        if(item.getItemId()==android.R.id.home){
            onBackPressed();
        }
        return super.onOptionsItemSelected(item);
    }

    @Override
    protected void onDestroy() {
        if (barVisualizer != null)
        {
            barVisualizer.release();
        }
        super.onDestroy();
    }

    @Override
    protected void onCreate(Bundle savedInstanceState) {
        super.onCreate(savedInstanceState);
        setContentView(R.layout.activity_music__player);

        getSupportActionBar().setTitle("Now Playing");
        getSupportActionBar().setDisplayHomeAsUpEnabled(true);
        getSupportActionBar().setDisplayShowHomeEnabled(true);

        PlayBtn = (Button)findViewById(R.id.playbtn);
        NextBtn = (Button)findViewById(R.id.btnNext);
        PrevBtn = (Button)findViewById(R.id.btnPrev);
        FastForwardBtn = (Button)findViewById(R.id.btnFastForward);
        RevindBtn = (Button)findViewById(R.id.btnRevind);
        Name_Song = (TextView)findViewById(R.id.text1);
        txt_Start = (TextView)findViewById(R.id.txtStart);
        txt_End = (TextView)findViewById(R.id.txtStop);
        seekBar = (SeekBar)findViewById(R.id.seek_bar);
        barVisualizer = (BarVisualizer)findViewById(R.id.blast);
        imageView = (ImageView) findViewById(R.id.song_icon);


        Intent i = getIntent();
        Bundle bundle=i.getExtras();
        mySongs = (ArrayList)bundle.getParcelableArrayList("songs");
        String SONG_NAME = (String)bundle.getString("song_name");
        position= (int)bundle.getInt("pos",0);
        Name_Song.setSelected(true);
        Uri uri= Uri.parse(mySongs.get(position).toString());
        Sname = mySongs.get(position).getName();
        Name_Song.setText(Sname);

        if(mediaPlayer!=null)
        {
            mediaPlayer.stop();
            mediaPlayer.release();
        }

        mediaPlayer = MediaPlayer.create(getApplicationContext(),uri);
        mediaPlayer.start();


        updateSeekBar= new Thread(){
            @Override
            public void run() {
                int totalDuration = mediaPlayer.getDuration();
                int currentPosition = 0;
                while(currentPosition<totalDuration)
                {
                    try {
                        sleep(500);
                        currentPosition= mediaPlayer.getCurrentPosition();
                        seekBar.setProgress(currentPosition);
                        }
                    catch (InterruptedException | IllegalStateException e)
                    {
                        e.printStackTrace();
                    }

                }
            }
        };
        seekBar.setMax(mediaPlayer.getDuration());
        updateSeekBar.start();
        seekBar.setOnSeekBarChangeListener(new SeekBar.OnSeekBarChangeListener() {
            @Override
            public void onProgressChanged(SeekBar seekBar, int progress, boolean fromUser) {

            }

            @Override
            public void onStartTrackingTouch(SeekBar seekBar) {

            }

            @Override
            public void onStopTrackingTouch(SeekBar seekBar) {
                mediaPlayer.seekTo(seekBar.getProgress());
            }
        });

        String endTime = createTime(mediaPlayer.getDuration());
        txt_End.setText(endTime);

        final Handler handler= new Handler();
        final int Delay =1000;
        handler.postDelayed(new Runnable() {
            @Override
            public void run() {
                String currentTime = createTime(mediaPlayer.getCurrentPosition());
                txt_Start.setText(currentTime);
                handler.postDelayed(this,Delay);
            }
        },Delay);

        PlayBtn.setOnClickListener(new View.OnClickListener() {
            @Override
            public void onClick(View v) {
                if(mediaPlayer.isPlaying())
                {
                    PlayBtn.setBackgroundResource(R.drawable.ic_baseline_play_arrow_24);
                    mediaPlayer.pause();
                }
                else
                {
                    PlayBtn.setBackgroundResource(R.drawable.ic_baseline_pause_24);
                    mediaPlayer.start();
                }
            }
        });

        mediaPlayer.setOnCompletionListener(new MediaPlayer.OnCompletionListener() {
            @Override
            public void onCompletion(MediaPlayer mp) {
                NextBtn.performClick();
            }
        });
        int audioSessionId = mediaPlayer.getAudioSessionId();
        if(audioSessionId!=-1)
        {
            barVisualizer.setAudioSessionId(audioSessionId);
        }

        NextBtn.setOnClickListener(new View.OnClickListener() {
            @Override
            public void onClick(View v) {
                mediaPlayer.stop();
                mediaPlayer.release();
                position = (((position+1)==mySongs.size())?0:position+1);
                Uri u = Uri.parse(mySongs.get(position).toString());
                mediaPlayer = MediaPlayer.create(getApplicationContext(),u);
                Sname = mySongs.get(position).getName();
                Name_Song.setText(Sname);
                mediaPlayer.start();
                PlayBtn.setBackgroundResource(R.drawable.ic_baseline_pause_24);
                StartAnimation(imageView);
                int audioSessionId = mediaPlayer.getAudioSessionId();
                if(audioSessionId!=-1)
                {
                    barVisualizer.setAudioSessionId(audioSessionId);
                }
            }
        });
        PrevBtn.setOnClickListener(new View.OnClickListener() {
            @Override
            public void onClick(View v) {
                mediaPlayer.stop();
                mediaPlayer.release();
                position=((position-1)<0)?mySongs.size()-1:(position-1);
                Uri uri1 = Uri.parse(mySongs.get(position).toString());
                mediaPlayer = MediaPlayer.create(getApplicationContext(),uri1);
                Sname = mySongs.get(position).getName();
                Name_Song.setText(Sname);
                mediaPlayer.start();
                PlayBtn.setBackgroundResource(R.drawable.ic_baseline_pause_24);
                StartAnimation(imageView);
                int audioSessionId = mediaPlayer.getAudioSessionId();
                if(audioSessionId!=-1)
                {
                    barVisualizer.setAudioSessionId(audioSessionId);
                }
            }
        });

        FastForwardBtn.setOnClickListener(new View.OnClickListener() {
            @Override
            public void onClick(View v) {
                if(mediaPlayer.isPlaying())
                {
                    mediaPlayer.seekTo(mediaPlayer.getCurrentPosition()+10000);
                }
            }
        });
        RevindBtn.setOnClickListener(new View.OnClickListener() {
            @Override
            public void onClick(View v) {
                if(mediaPlayer.isPlaying())
                {
                    mediaPlayer.seekTo(mediaPlayer.getCurrentPosition()-10000);
                }
            }
        });

    }
    public void StartAnimation(View view)
    {
        ObjectAnimator animator= ObjectAnimator.ofFloat(imageView,"rotation",0f,360f);
        animator.setDuration(1000);
        AnimatorSet animatorSet = new AnimatorSet();
        animatorSet.playTogether(animator);
        animatorSet.start();
    }
    public String createTime(int duration)
    {
        String time ="";
        int min = duration/1000/60;
        int sec = duration/1000%60;
        time+=min+":";
        if(sec<10)
        {
            time+="0";
        }
        time+=sec;
        return time;
    }
}
You can download the full project from here :
Thank You.