Android Application to add Captured Photos in a Gridview.
So, as a beginner my first project in Android Studio was to make my own gallery kinda app. So, my app will do 2 things basically :
- It will capture the photo.
- It will show those photos in Gridview and will also save them in my phone’s local gallery.
And I learnt :
- Total working of Gridview.
- Internal and External storage of my android device and how my app communicate with internal and external storage.
So, am here sharing my code snippets and , every new thing that particular snippet told me. Though its a very basic app but really it took a lot of time but it was worthed ;)
- res>layout>activity_main.xml
<?xml version="1.0" encoding="utf-8"?>
<RelativeLayout xmlns:android="http://schemas.android.com/apk/res/android"
    xmlns:app="http://schemas.android.com/apk/res-auto"
    xmlns:tools="http://schemas.android.com/tools"
    android:layout_width="match_parent"
    android:layout_height="match_parent"
    tools:context=".MainActivity">
<GridView
    android:id="@+id/grid1"
    android:layout_width="match_parent"
    android:layout_height="match_parent"
    android:numColumns="auto_fit"
    android:horizontalSpacing="10dp"
    android:verticalSpacing="10dp"
    android:listSelector="@color/blue"/>
    <ImageButton
        android:id="@+id/cameraID"
        android:layout_width="50dp"
        android:layout_height="50dp"
        android:layout_alignParentBottom="true"
        android:layout_alignParentRight="true"
        android:background="@drawable/circle"
        android:foreground="@drawable/ic_baseline_add_24"/>
</RelativeLayout>
Its a Relative Layout with ImageButton and GridView.
ImageButton : Its a simple button with an image on it. When clicked by user, it will open camera. I defined background of my button to have a circular shape and orange color. By this code :
In res>drawable>circle.xml
<?xml version="1.0" encoding="utf-8"?>
<shape xmlns:android="http://schemas.android.com/apk/res/android">
    android:shape="rectangle">
    <solid android:color="@color/orange"/>
    <corners android:radius="300dp"/>
</shape>
Foreground of my ImageButton have a “+” sign. I defined this by code:
res>drawable>right click > go to new >vector asset>choose a clipart with “+” . It will create an xml file for you . here you can change the size and color of your vector. Finally set this vector image as the foreground of your ImageButton. !!We are done with image button!! It will look like this:

GridView : Its a 2D scrolling Grid having rows and columns. We insert the item to the GridView using a List Adapter. These items need not to be predefined and here also we will add the items to the gridview dynamically(with the click of each picture). Talking about the attributes of GridView in “activity_main.xml” file ; we are specifying horizontal and vertical spacing between the items in the Grid. The list selector color will tell the color of the item when we tap on it.
Now, to insert the items to the GridView we need an ADAPTER(it’s a bridge between our UI Component(grid) and data source that contain the data for UI component(data source is list in our case). So, this brings us to the need to define an Adapter class to implement the functionality of our Adapter.
java>package name>right-click>new java file>imageAdapter.java
package com.example.mygallery;

import android.content.Context;
import android.graphics.Bitmap;
import android.graphics.BitmapFactory;
import android.view.View;
import android.view.ViewGroup;
import android.widget.BaseAdapter;
import android.widget.GridView;
import android.widget.ImageView;

import java.io.File;
import java.io.FileInputStream;
import java.io.IOException;
import java.util.List;

public class ImageAdapter extends BaseAdapter {
    private Context context;
    List<String> image_path;

    public ImageAdapter(Context c,List<String> i)
    {
        context=c;
        image_path=i;
    }
    @Override
    public int getCount() {
        if(image_path!=null)
        {
            return image_path.size();
        }
        else
            return  0;
    }

    @Override
    public Object getItem(int position) {
        return position;
    }

    @Override
    public long getItemId(int position) {
        return position;
    }

    @Override
    public View getView(int position, View convertView, ViewGroup parent)
    {
        ImageView imageView;
        BitmapFactory.Options bfOptions=new BitmapFactory.Options();
        bfOptions.inDither=false;                     //Disable Dithering mode
        bfOptions.inPurgeable=true;                   //Tell to gc that whether it needs free memory, the Bitmap can be cleared
        bfOptions.inInputShareable=true;              //Which kind of reference will be used to recover the Bitmap data after being clear, when it will be used in the future
        bfOptions.inTempStorage=new byte[32 * 1024];
        if (convertView == null)
        {
            imageView = new ImageView(context);
            imageView.setLayoutParams(new GridView.LayoutParams(ViewGroup.LayoutParams.MATCH_PARENT, ViewGroup.LayoutParams.MATCH_PARENT));
            imageView.setPadding(0, 0, 0, 0);
        }
        else
         {
            imageView = (ImageView) convertView;
         }
        FileInputStream fs = null;
        Bitmap bm;
        try {
            fs = new FileInputStream(new File(image_path.get(position).toString()));
            if(fs!=null)
            {
                bm=BitmapFactory.decodeFileDescriptor(fs.getFD(), null, bfOptions);   //decoded bitmap
                imageView.setImageBitmap(bm);
                imageView.setId(position);
                imageView.setLayoutParams(new GridView.LayoutParams(200, 160));
            }
        } catch (IOException e)
        {
            e.printStackTrace();
        } finally{
            if(fs!=null) {
                try {
                    fs.close();
                } catch (IOException e) {
                    e.printStackTrace();
                }
            }
        }
        return imageView;
    }
}
In this ImageAdapter class we have a constructor and some overriden methods:
- Constructor : which initialise 2 data members ; (a) context (b) List[List of the paths of the captured images].
- getCount() : returns the size of the list i.e. it returns the number of elements gridview is gonna display.
- getItem(int i) : it takes the index as an argument and returns the data item at that index.
- getItemId(int i) : it takes the index and returns the id of the item being displayed in the gridview.
- getView(int position, View convertView, ViewGroup parent): A VERY IMPORTANT FUNCTION.
Arguments :
(a) int position : index of the items in the list which contain the path of captured we gonna display in gridView.
(b) View convertView : when we scroll down the gridview ; some of it’s views will not be visible to us in the screen. So those views can be reused ; these reused views are convertViews. If we are scrolling down our grid; we have to check if there is any convertView available to get reused. If not so ; we have to create a new View for the next item else we can reuse the convertView.(this explains the if-else part of the code for this function)
( c) ViewGroup parent : it’s a container view(grid view for our case) that will contain the view of items generated by the functions.
Return Type : It returns the view of items in the grid view.
Now, our image will be in the form of a file within a directory with some path name. How this file will have the image? this file’s gonna have the image in a compressed bitmap format(uses kinda co-ordinate format to store pixels of image). How we compressed the image and put it down in a file? This is what we gonna see ahead. For now all we know is : our image is in a file and it is in a compressed bitmap format and we need to : decode this and then put this image in our gridview.
For decoding image we gonna use
bm=BitmapFactory.decodeFileDescriptor(fs.getFD(), null, bfOptions); Now this function will return a decoded bitmap(bm) from the file (fs), with some padding(null in our case) and this bitmap (bm) so produced will be controlled by some options that we will have to set in our code, these are those options given by BitmapFactory class.
BitmapFactory.Options bfOptions=new BitmapFactory.Options();
bfOptions.inDither=false;
bfOptions.inPurgeable=true;
bfOptions.inInputShareable=true;
bfOptions.inTempStorage=new byte[32 * 1024];
With this now we have a decoded bitmap and now we have to set this bitmap as the content of imageView of our parent GridView. We will specify the parameters of how we want the imageView to get arranged in GridView by a function called “setLayoutParams”
imageView.setImageBitmap(bm);
imageView.setId(position);
imageView.setLayoutParams(new GridView.LayoutParams(200, 160));
With this now we have finally learnt how to generate a view(imageView in our case) for the data (list containing the path of captured image files in our case) and finally arranging that view(imageView) in parentView(GridView).
With this our ImageAdapter class is done. Now we will head toward : capturing image > adding compressed image in a file>obtaining the path of the file>adding that path to a list>then passing that list to ImageAdapter (whose funtionallity has been defined already). This brings us to the new part:
java>package name>MainActivity.java
Our Layout just have 2 views(GridView and ImageButton), so firstly lets initialise and define them. Also we need to have a list to store the path of image files .
@Override
protected void onCreate(Bundle savedInstanceState) {
    super.onCreate(savedInstanceState);
    setContentView(R.layout.activity_main);

    captureBtn = (ImageButton)findViewById(R.id.cameraID);
    captureBtn.setOnClickListener(this);
    grid = ( GridView) findViewById(R.id.grid1);

    listOfImagesPath = null;
    listOfImagesPath = RetriveCapturedImagePath();
    if(listOfImagesPath!=null){
        grid.setAdapter(new ImageAdapter(this,listOfImagesPath));
    }
}
What is RetriveCapturedImagePath() method we’re gonna see it later. For now keep in mind that we are calling “setAdapter” method only when “listofImagesPath != null” otherwise it will give you a nullPointerException at runtime.
Moving ahead; let’s define OnClick method for our CaptureBtn. So basically we want that on the click of the button it will open the camera. That means we have to start an intent from the current activity to the camera. If the device is not supporting a camera this can cause an ”ActivityNotFoundException”, so we will have to keep the code within try-catch blocks .
@Override
public void onClick(View arg0) {
    if (arg0.getId() == R.id.cameraID) {
        try {
            Intent captureIntent = new Intent(MediaStore.ACTION_IMAGE_CAPTURE);
            startActivityForResult(captureIntent, CAMERA_CAPTURE);
        } catch(ActivityNotFoundException anfe){
            String errorMessage = "Whoops – your device doesn’t support capturing images!";
            Toast toast = Toast.makeText(this, errorMessage, Toast.LENGTH_SHORT);
            toast.show();
        }
    }
}
Notice the function startActivityForResult(intent,permission) ; this functions means that this intent will return the data in onActivityResult() method, so we have to handle that data in that very method.
This data returned by this intent will be the key associated with image we captured . So with the help of key (data) we will have to get the value(captured image) , we’re gonna use “bundles” for mapping this key-value pair. After we get the captured image(value), we will convert it into the bitmap with this code snippet :
Bundle extras = data.getExtras();    //map from key to value
Bitmap thePic = extras.getParcelable("data");   //returns the //value(image) associated with the given key(data)and store it as //bitmap in "thePic"
We have our captured image in a bitmap format. Now we have to store the compressed bitmap in a file, for this we need to create a path for the file first.
Our captured images will be stored in our phone’s gallery as well. So within the gallery we will create a directory called “GridViewDemo” to save our images. So firstly; we need to create the path to the directory; here’s the string path for our directory:
public static final String GridViewDemo_ImagePath =
        Environment.getExternalStorageDirectory().getAbsolutePath() + "/GridViewDemo/";
Done with the path to directory; now we have to design path for each image file going to be in this directory. We will form the path to each file by using time of each click.
String imgcurTime = dateFormat.format(new Date());
File imageDirectory = new File(GridViewDemo_ImagePath);
imageDirectory.mkdirs();
String _path = GridViewDemo_ImagePath + imgcurTime + ".jpg";
As now we have the path of our image file; we will now create a file with that path name and then store compressed bitmap image in that file. We are gonna write in the file ; this can cause exception FileNotFound , we have to use try-catch block for that.
try {
    FileOutputStream out = new FileOutputStream(_path);
    thePic.compress(Bitmap.CompressFormat.JPEG, 90, out);
    out.close();
} catch (FileNotFoundException e) {
    e.getMessage();
}
As we are done with our file now; we can now add the path of the file to our list and send this list to our ImageAdapter.
listOfImagesPath = RetriveCapturedImagePath();
if (listOfImagesPath != null) {
    grid.setAdapter(new ImageAdapter(this, listOfImagesPath));
}
RetrieveCapturedImagePath () : this method will return the list conatining path of all the image files in the directory.
private List<String> RetriveCapturedImagePath() {
    List<String> tFileList = new ArrayList<String>();
    File f = new File(GridViewDemo_ImagePath);
    if (f.exists()) {
        File[] files=f.listFiles();
        Arrays.sort(files);
        for(int i=0; i<files.length; i++){
            File file = files[i];
            if(file.isDirectory())
                continue;
            tFileList.add(file.getPath());
        }
    }
    return tFileList;
}
This function is basically getting pathname (getPath()) of each image file in the directory and adding it to a list.
Complete code for MainActivity.java :
package com.example.mygallery;

import androidx.annotation.NonNull;
import androidx.appcompat.app.AppCompatActivity;
import androidx.core.app.ActivityCompat;
import androidx.core.content.ContextCompat;

import android.Manifest;
import android.app.Activity;
import android.content.ActivityNotFoundException;
import android.content.Intent;
import android.content.pm.PackageManager;
import android.graphics.Bitmap;
import android.media.Image;
import android.net.Uri;
import android.os.Bundle;
import android.os.Environment;
import android.provider.MediaStore;
import android.view.Menu;
import android.view.View;
import android.widget.AdapterView;
import android.widget.Button;
import android.widget.GridView;
import android.widget.ImageButton;
import android.widget.Toast;

import java.io.File;
import java.io.FileNotFoundException;
import java.io.FileOutputStream;
import java.io.IOException;
import java.text.DateFormat;
import java.text.SimpleDateFormat;
import java.util.ArrayList;
import java.util.Arrays;
import java.util.Date;
import java.util.List;

public class MainActivity extends Activity implements View.OnClickListener {
    ImageButton captureBtn = null;
    final int CAMERA_CAPTURE = 1;
    private Uri picUri;
    private DateFormat dateFormat = new SimpleDateFormat("yyyy-MM-dd HH:mm:ss");
    private GridView grid;
    private  List<String> listOfImagesPath;

    public static final String GridViewDemo_ImagePath =
            Environment.getExternalStorageDirectory().getAbsolutePath() + "/GridViewDemo/";

    @Override
    protected void onCreate(Bundle savedInstanceState) {
        super.onCreate(savedInstanceState);
        setContentView(R.layout.activity_main);

        captureBtn = (ImageButton)findViewById(R.id.cameraID);
        captureBtn.setOnClickListener(this);
        grid = ( GridView) findViewById(R.id.grid1);

        listOfImagesPath = null;
        listOfImagesPath = RetriveCapturedImagePath();
        if(listOfImagesPath!=null){
            grid.setAdapter(new ImageAdapter(this,listOfImagesPath));
        }
    }


    @Override
    public void onClick(View arg0) {
        // TODO Auto-generated method stub
        if (arg0.getId() == R.id.cameraID) {
            try {
                //use standard intent to capture an image
                Intent captureIntent = new Intent(MediaStore.ACTION_IMAGE_CAPTURE);
                //we will handle the returned data in onActivityResult
                startActivityForResult(captureIntent, CAMERA_CAPTURE);
            } catch(ActivityNotFoundException anfe){
                //display an error message
                String errorMessage = "Whoops – your device doesn’t support capturing images!";
                Toast toast = Toast.makeText(this, errorMessage, Toast.LENGTH_SHORT);
                toast.show();
            }
        }
    }

    protected void onActivityResult(int requestCode, int resultCode, Intent data) {
        super.onActivityResult(requestCode, resultCode, data);
        if (resultCode == RESULT_OK) {
            //user is returning from capturing an image using the camera
            if (requestCode == CAMERA_CAPTURE) {
                Bundle extras = data.getExtras();
                Bitmap thePic = extras.getParcelable("data");
                String imgcurTime = dateFormat.format(new Date());
                File imageDirectory = new File(GridViewDemo_ImagePath);
                imageDirectory.mkdirs();
                String _path = GridViewDemo_ImagePath + imgcurTime + ".jpg";
                try {
                    FileOutputStream out = new FileOutputStream(_path);
                    thePic.compress(Bitmap.CompressFormat.JPEG, 90, out);
                    out.close();
                } catch (FileNotFoundException e) {
                    e.getMessage();
                } catch (IOException e) {
                    e.printStackTrace();
                }
                listOfImagesPath = null;
                listOfImagesPath = RetriveCapturedImagePath();
                if (listOfImagesPath != null) {
                    grid.setAdapter(new ImageAdapter(this, listOfImagesPath));
                }
            }
        }
    }

    private List<String> RetriveCapturedImagePath() {
        List<String> tFileList = new ArrayList<String>();
        File f = new File(GridViewDemo_ImagePath);
        if (f.exists()) {
            File[] files=f.listFiles();
            Arrays.sort(files);
            for(int i=0; i<files.length; i++){
                File file = files[i];
                if(file.isDirectory())
                    continue;
                tFileList.add(file.getPath());
            }
        }
        return tFileList;
    }
}
Don’t forget to add these permissions in Manifest.xml:
<uses-permission android:name="android.permission.CAMERA" />
<uses-permission android:name="android.permission.READ_EXTERNAL_STORAGE" />
<uses-permission android:name="android.permission.WRITE_EXTERNAL_STORAGE" />
Output :
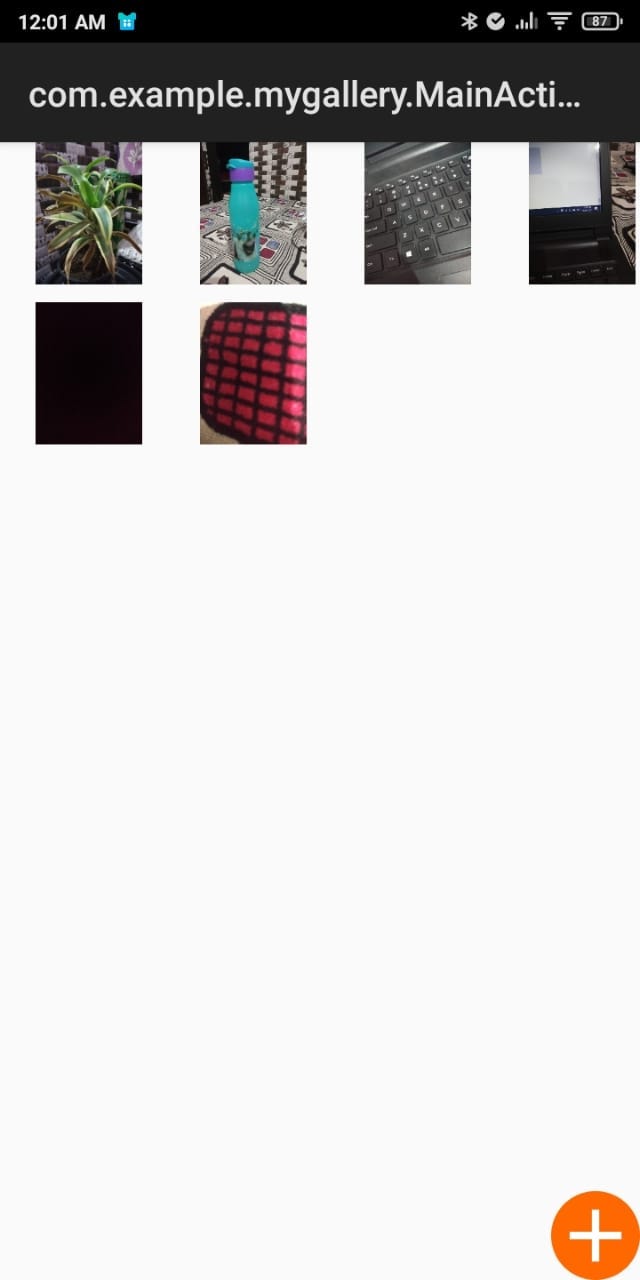
This all for this.
Thank You!!